Wednesday, August 30, 2006

LEGO MINDSTORMS NXT

mindstorms
As I was growing up, a part of my toy collection included a Lego set. It was so simple, yet so fulfilling. I enjoyed building different things and making my own creations with what I was given. Lego is still around, but times have changed. I never thought I’d be playing with Lego as an adult, but I have no shame. I admit that I’ve been playing with a Lego set. Too cool to resist, LEGO MINDSTORMS NXT just hit the stores this month, and it gives Lego a robot twist.

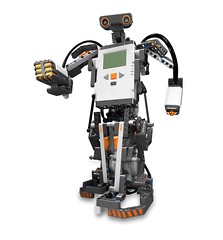
LEGO MINDSTORMS NXT is a robotics toolset that provides endless opportunities for you robotics and LEGO fanatics (ages 10 and older) to build and program robots to do what you want. It comes with a NXT Intelligent Brick, three interactive servo motors, sensors and programming software. The Intelligent Brick is considered the “brain” of your robot, and includes a 32-bit microprocessor, four input ports, three output ports, seven six-wire cords, a matrix display, real sound speaker, USB 2.0 and Bluetooth. The three servo motors bring your creations to life as the rotation sensor measures one degree steps for precise movement.

There are four different sensors on your NXT. The Ultrasonic Sensor is considered the “eyes” of the robot and measures distance, movements and detects objects. The Sound Sensor, known as the “ears,” allows your creation to react to sound commands and patterns and recognize tones. The Touch Sensor gives you the “fingers,” and will react to touch or release. The Light Sensor will detect different colors and light intensity. Additionally, the programming software, powered by LabVIEW from National Instruments, is easy-to-use with its drag and drop environment for “building” programs, and compatible with your PC or Mac. There are 18 robot challenges with step-by-step building instructions to get your feet wet with the process. You can create just about anything from humanoids to animals to machinery or vehicles, using the 519 hand-selected elements from the LEGO TECHNIC building system.

My favorite feature is the Bluetooth capability. I can transfer all my programs to my NXT from my computer wirelessly. I can also control the robot with Bluetooth via my cell phone (or if I had one, a PDA). If Bluetooth intimidates you, use the included USB 2.0 cable to directly connect the NXT to your computer. Either way, after you complete the downloads, your robot will take on a life of its own, completely autonomous from your computer.

The NXT is the next generation of LEGO MINDSTORMS, and is built upon the success of the globally-renowned Robotics Invention System. “When LEGO MINDSTORMS launched, we fundamentally changed the way people viewed LEGO building and play and helped spark the trend of affordable and attainable consumer robotics,” says Jorgen Vig Knudstrop, CEO, LEGO Group. “We’ve developed the new toolset with expanded components and capabilities to challenge our existing community of dynamic fans. Meanwhile, the system’s new software, design and 30-minute quick-start program are geared toward recruiting a new, younger generation of robotics enthusiasts,” he added. This little toy just makes it possible for people like you and me to build our own affordable robot.

Find a LEGO MINDSTORMS NXT of your own for $249.99 at www.legoshop.com. There you can also purchase additional pieces for your robot.

Friday, August 25, 2006

Playing It Cool With Lapinator

lapinator
I do the majority of my writing with my trusty laptop computer, and I use it anywhere and everywhere, except for my desk. My lap is my laptop’s desk, and I always need to have some sort of padding (such as a towel or folded t-shirt) so I don’t burn my legs. I can usually still feel the heat through padding, and after awhile it becomes increasingly uncomfortable, especially after I start sweating in our humid heat.

I never actively sought out a solution to the laptop heat issue, but last week as I was surfing the Internet, I just happened to come across this thing called the Lapinator. It’s been on the market for awhile, but no one I’ve talked to has heard about it yet, so I thought I’d share it with you avid laptop users anyway. The Lapinator is a platform for your laptop computer that you place on your lap while you use it. It provides stability, and a solution to the heat. I’m using the Lapinator as I’m writing this story, and although I feel a small amount of heat coming off it right now, it’s nothing compared to the regular padding I usually use.

The Lapinator sits about an inch off your lap, so you don’t feel the heat of the Sahara Desert on your legs. The top part is made out of a sturdy non-slip polypropylene material, and you have the option of attaching self-adhesive bumpers that lifts your laptop up to allow more airflow. The bottom is made out of the durable, yet comfortable 3M Thinsulate material, which also fully covers the two elevation pads. Should you have your laptop plugged into anything, there is a piece of One-Wrap Velcro attached that will securely hold all your cords together.

After doing a temperature comparison, I can say that the Lapinator truly works. I used the Temperature Monitor 3.7 software to measure various internal components of my computer, but I paid special attention to the power supply and the processor’s temperatures. Upon opening my laptop (I usually keep it on, but closed and in sleep mode), it measured in at about 110°F. After using it for about an hour with nothing on my lap, the processor peaked at 135°F and the power supply at 133°F. I waited a couple hours for it to cool off and opened it again. It started out the same at 110°F, then after an hour of using the Lapinator, the peak temperatures came in at 126°F for the processor and 125°F for the power supply. Not bad at all.

The standard Lapinator is 12x13x1 inches and weighs 11 ounces, so if you have a decent-sized laptop bag, it will fit right in there. The Lapinator Plus is slightly bigger, weighing in at 15 ounces, and has dimensions of18x12x1 inches. This is better for the 17” notebooks such as mine, but it may not fit in your laptop bag. If you use a mouse with your laptop, there is also a Mousitizer attachment you can use your full-sized mouse with.

The Lapinator is $24.95 and the Lapinator Plus is $29.95 at www.lapinator.com. You can also find the Mousitizer there for $9.99. Also keep in mind for your workplace logo items, you can special order Lapinators with your company’s logo imprinted.

Wednesday, August 23, 2006

A Seat Guru For Airline Travelers

seatguru
I’m very particular about where I will sit on an airplane. I hate sitting next to the lavatories because of the smell, and I don’t enjoy being squished in the middle of a row somewhere, whether it’s a three or five-seat row. I prefer to have a bulkhead or emergency exit seat so I can stretch out my legs (I’m tall, so this is helpful).

Let me tell you . . . on a plane ride home from Los Angeles, I had the worst experience ever. I was stuck in the middle of a five-seat row, located next to the bathroom. My worst living nightmare. There were no other seats available, so I had no choice. The person in front of me decided to recline his seat, I had my laptop folded open, standing up on its bottom on my leg, and the screen almost touching my chest, while typing with my elbows extended out. I ended up elbowing my husband and the lady next to me, as I was *trying* to type out my MidWeek story that was due right after the plane landed. I was squished, not to mention mad! Needless to say, I will never fly again without checking this nifty website I found called SeatGuru.

If you’re a discriminating airplane traveler as I am, you will appreciate SeatGuru, and you’ll never leave home without looking at it first. It will be your ultimate source for finding out airplane seating, in-flight amenities and airline information. This website provides you with detailed seat maps, and in-depth seat specific comments denoting seats with limited recline, reduced legroom and misaligned windows. The color-coding helps you identify superior and substandard seats. You’ll see green for a good seat, red for a poor seat and yellow for “be aware.” The power port locations are noted with a dot, and the galley, lavatory, closet and exit row locations are indicated with a colored G, L, C, or red arrows for the exit locations. I try to go for all the green-colored seats, preferably with the power ports.

To start off, use the alphabetized menu on the left, and select the airline and aircraft you will be flying on. You can then view the airline’s general information page, which provides you with quick links and contact information. You can navigate through the tabs on tips on Check-In, Baggage, Unaccompanied Minors and Traveling with infants for fun.

A full diagram of the plane will appear, complete with a seating chart. It also includes row numbers and the amount of seats in First Class and Economy Class. You can mouse over the seats to view complete seat descriptions and comments. It will even tell you the seat pitch and seat width at the top of the page. For your own sanity, just look for the green seats . . . green is good.

To further your flying experience, look for the amenity icons. These show the in-flight services available on your airplane. Each plane’s page has an in-flight amenity box. The amenity icons represent the services that are available on the aircraft you’re viewing. The icons you’ll see are: Audio, Video, AC power, Internet, Food and Infant. You can click on the individual icons for details and links to additional information. If the icon you’re looking for isn’t pictured, that service is not offered on the aircraft.

Visit www.seatguru.com to become seat-smart on your next trip.

Friday, August 18, 2006

Becoming A Comic Book Artist

comicbook
While I was growing up, and sometimes nowadays, I enjoy reading a good comic book from time to time. Although I was never really good at it, I used to draw often, make attempts to duplicate my favorite comic characters on paper, and give multiple copies to family members. Well, since I discovered at an early age that I’m no artist, and no comic book artist at that, I truly appreciate Planetwide Games’ Comic Book Creator software, which allows me to do it all on the computer without lifting a pen (or crayon).

Comic Book Creator gives you the ability you to create customized comic books using your own pictures or screenshots, and now, Marvel characters. Under a special agreement between Marvel Comics and Planetwide Games, Marvel Heroes Comic Book Creator was created. Some of the characters to be included are X-Men, Spider-Man, Fantastic Four, Hulk, Daredevil, Ghost Rider, The Punisher, Captain America, Thor, The Avengers and Dr. Octopus. Future additional booster packs will include Marvel Retro, Spidey and Friends, and more Ghost Rider collections.

Marvel Heroes Comic Book Creator is a simple and easy-to-use self-publishing software. It puts you in the Marvel artist’s seat as you import authentic Marvel Heroes digital images and content to create personalized comic books and strips. You can create your unique Marvel stories by easily dropping and dragging the images into the boxes. You can then let your creativity flow further when you add in your text bubbles. Your visions will come to life on screen in a matter of seconds. This also goes for the regular Comic Book Creator as well. You can tell an entire story with the pictures you took from the last party. It’s a fun thing to print out and show to all your friends. You can also make a pdf of the entire comic book and share it via e-mail or on your website / blog.

“Marvel heroes are some of the most recognizable and beloved characters in the history of entertainment,” said Kevin Donovan, president of Planetwide Games. “By marrying Marvel’s pantheon of heroes with our original ‘Comic Book Creator’ self-publishing software we are making it possible for legions of fans to tap their own creativity in creating professional quality digital and homemade comic books with authentic Marvel Comics art for their personal enjoyment.”

If you are a big Marvel fan, the Marvel Heroes Comic Book Creator adds a complementary interactive entertainment experience to your Marvel video games and your Marvel movies. Other available software from Planetwide Games includes Virgin Comics Comic Book Creator, Sony Online Entertainment Comic Book Creator, National Geographic Kids Comic Book Creator, and Nacho Libre Comic Book Creator. If you’re a teacher, these software packages are a great way to motivate your students and peak their interests and simultaneously assist in literary skills, creativity and publishing.

All versions of Comic Book Creator offer you about 100 layout templates to choose from, including front and back covers. Unfortunately, you cannot create your own template. But, if the 100+ aren’t enough, there will be more available in the near future. Upcoming Comic Book Creator editions will include audio, video, animations and flash animations to create a new dimension of “HyperComics” advanced Web 2.0 style interaction.

Overall, this software is definitely fun to play with, and I would recommend this to anyone with keiki, or if you’re a keiki at heart. Although I do admire the Marvel characters, I had the most fun with putting in pictures, and adding humorous comments into the text bubbles next to my friends.

Marvel Heroes Comic Book Creator is available for your PC only (no Mac version), and you can find it starting next Friday, August 25th. Visit www.mycomicbookcreator.com/marvelheroes to purchase it for $29.99. You can also download a free 30-day trial version of Comic Book Creator to test the waters. It will let you do everything except for publish / print your creation.

Wednesday, August 16, 2006

Zillow Through Real Estate Market

zillow
With real estate the way it is these days, and myself a recent house-hunter, I was compelled to do my own extensive research on just about everything concerning the housing market. During this time, I discovered Zillow, the best online real estate tool I could ask for. It offers you the capability to find out instant home valuations and data for 67,000,000+ homes across the country for free.

If you’re a buyer, Zillow’s maps help you scope out different neighborhoods you’re interested in and gives you an at-a-glance look at the home prices in the area. It also shows you Comparables (aka comps), which contrast criteria from recently sold properties in a neighborhood, such as the sale price, house age and square footage. Your real estate agent will typically use comps to prepare a Comparative Market Analysis (CMA) for you. Zillow identifies these comps for you by calculating the Zestimate with the My Zestimator tool.

When you have a specific address selected, click on the Zestimate window that pops up. It will show the home’s details, including the type, lot size, bedrooms/baths, square footage and the year it was built. The Zestimate gives you the value range and whether or not it went up or down, and the Zestimate Ranking (i.e. For one of the searches I did, it said, 78% of homes in the 96734 zip code have a lower value than this home). Additionally as a buyer, you can take a look at the financing section. It gives you the option to request a quote, and take look at national mortgage and interest rates.

From the seller’s perspective, use the Zestimate to see your home’s estimated market value, using Zillow’s proprietary formula. Of course the values aren’t 100% on the mark, but it gives you a rough idea of coming up with a fair asking price. If you’re curious about the past, you can go back in time and look up historical Zestimates. This is crucial to seeing how your home has appreciated or depreciated over the years.

You home owners can take advantage of the My Zestimator feature by editing your home’s facts, such as home improvements, special features, and refining your comps list. These little tweaks will give you a better idea of what your house is worth.

Other features you can use are the Bird’s Eye View or heat maps, but unfortunately not for Hawaii yet (since the website is still in beta). The Bird’s Eye view allows you to see satellite images (3-D like images) from all angles. If you’re curious, can also look up famous homes such as the Beverly Hillbillies mansion, The Brady Bunch home or the Osbourne’s MTV house. In addition, the heat maps will show you quick neighborhood comparisons, using different colors. There are 17 sample cities you can look at, but sorry, no Hawaii again.

If you’re concerned about privacy on Zillow, you don’t have to worry about it since you don’t enter any personal information, and no one will contact you. Overall, Zillow provides us, the average consumer, a way to look up information that was previously only privy to those in the real estate industry. Whether you’re in the market for a new home, or just inquisitive, take advantage of it at www.zillow.com.

Friday, August 11, 2006

The Latest Look At Apple

macpro
If I had the time, I would have attended the Apple Worldwide Developer’s Conference (WWDC) 2006 this year to experience the latest and greatest of Apple’s new upcoming offerings, and the chance to dive deep into the full range of the Mac OS X technologies, including applications, graphics and media, development tools and OS foundations. This Apple-geek event was held this past week August 7 – 11 in San Francisco. Despite the fact that I wasn’t there, I closely followed it and had my ears perked up for all the announcements.

There were four major items Apple announced: Mac OS X Version 10.5 Leopard, Mac OS X Server Leopard, Mac Pro Featuring Quad 64-bit Xeon Processors and the Xserve with Quad 64-bit Xeon Processors.

Leopard is the sixth major version of Mac OS X to hit the market, and you’ll be able to buy it in Spring 2007. Major innovative features of Leopard include Time Machine, Spaces and enhanced Mail & iChat.

Although you should be backing up your computer on a regular basis anyway, if you’re one of those people who don’t have the patience , Time Machine makes backing up very simple. Time Machine will offer you the ability to travel back in time within your computer to find deleted files, applications, photos, or other digital media. A feature I know many, many users who accidentally delete their files (not mentioning any names) will appreciate. There are ways of doing that now, but believe me, it’s a huge pain in the you-know-what, and not fun. Time Machine will magically, automatically backup everything on your Mac to an external hard drive or Mac OS X Server. If your file is lost, you can restore your file instantly with one-click, using an intuitive time-based visual display to help you find it.

Spaces is a new way to group applications required for a given task into a “space,” and you can instantly switch between the spaces to bring the specific applications required for that given task. You can see a bird’s eye view of all your Spaces and choose where you want to go next with one keystroke on your keyboard or one mouse click.

Leopard’s new iChat makes communicating with friends and family to a whole to new level. Your iChat sessions will be more exciting with the ability to use Photo Booth effects to put images and videos in the background. iChat screen sharing will enable you to share your desktop pictures with your friends and work together in real time on activities, such as editing an iPhoto book. With the iChat Theater, you can share your iPhoto slide show, a QuickTime movie or Keynote presentation within your iChat window. Leopard’s Mail will include multiple templates with more than 30 customizable stationery designs to choose from. Additionally, Leopard’s Server version enables all the users to take full advantage of the essential services, including file and printer sharing, Mail, iCal, iChat, Address Book and backup.

The new Mac Pro quad Xeon 64-bit desktop workstation replaces the older Power Mac G5 line of computers. Featuring two new Dual-Core Intel Xeon processors running up to 3.0 GHz and a new high-speed system architecture, the new Mac pro workstation delivers up to twice the performance of the Power Mac G5 Quad, for almost $800 less. What does that translate to? A really, really fast computer that I am looking forward to owning.

This workstation represents the rapid and seamless transition for Apple, with the entire Mac family now using Intel’s latest processors. The Mac Pro features the new Dual-Core Intel Xeon 5100 series processor based on Intel Core microarchitecture. My favorite part about this machine is that you can install up to 2TB of storage, using four 500GB Serial ATA hard drives. I already have multiple ideas on what I will do with all that storage space. It has already hit the shelves at $2,499 at www.apple.com, the Apple Store at Ala Moana Center or your nearest CompUSA

Stay tuned for more to come . . .

Wednesday, August 09, 2006

Be A Star With PhotoShowTV

photoshowtv
Last week as I was falling asleep on the couch and my husband was doing some channel flipping, I stopped him in my sleep-deprived, half-awake dream state. I saw someone’s home video playing and it looked like it was here in Hawaii. For whatever reason, I physically got up off the couch to watch it. I’m glad I did because it turned out to be something pretty cool. It turns out we were actually watching other people’s pictures and video clips that were uploaded on TV from Oceanic Time Warner Cable’s new PhotoShowTV feature. Think of it almost a television version of YouTube (on the Internet).

PhotoShowTV is a fun and easy way for you to be the star of your own show and claim your two minutes of fame. All you need to do is share your favorite pictures and movie clips on television with the PhotoShow Deluxe software. It’s free if you’re a Road Runner subscriber, and downloadable at: www.photoshow.net/roadrunner. It will ask you for your Road Runner e-mail address, then it sends the software registration key to your Road Runner address.

Once installed, the software allows you to easily edit and touch-up your photos and video with multiple tools. With minimal effort, eliminate red eye, crop, rotate or adjust color levels. You can also locate and manage all your photos and videos on your computer, as PhotoShow Deluxe searches for these when you first install it. You’ll receive an intuitive album display view. You can also add music to your slideshows or archive your images to CDs (or professionally packaged DVDs for a fee).

Before you submit your PhotoShow slideshow, be sure it meets certain guidelines. It has to be TV-G content - no nudity, violence, profanity or anything else you wouldn’t want your keiki to see. Upload as many photos as you would like, however to be eligible for television placement, the length of the PhotoShow cannot exceed five minutes. But you may submit as many PhotoShows as you wish. Also, do not use any third party copyrighted material. Only use your original content.

After you’re done with your work of art, tell the software to share it, then you’ll receive an e-mail letting you know when your PhotoShow will be available to view on Time Warner Cable On Demand (Channel 917). You’re now all set to tell all your friends and family to watch your masterpiece on TV. It usually airs within a week of submission, but be patient since it may take longer depending upon how much participation is out there.

You can also share your PhotoShow online with PhotoShow Circle. You can display your PhotoShows in galleries on a personalized website. All PhotoShow Deluxe users automatically receive a free PhotoShow Circle account.

PhotoShow Deluxe is compatible with Windows 98 or higher. Unfortunately it will not work with a Mac. Go to rr.com/photoshowtv for more information, or to watch a demo.

Friday, August 04, 2006

A Power Station Traveller Plug

powerstationtraveller
I own so many gadgets that need to be recharged, it’s a spaghetti mess to keep track of what cord goes with each item. Additionally, when I’m traveling, the hotel room usually won’t have enough outlets for me to plug in all my digital toys in, so I’ve learned to travel with a power bar to keep it all together and still have enough power sources. I just hate to have them scattered across the room and plugged into whatever available outlet there is. It makes me paranoid that I’ll leave something behind.

Because I’m an organized person, I really love the new Power Station Traveller, made by ReSource, Inc. It makes life a bit easier by allowing me to simultaneously plug everything (well, at least three things at a time) into one place without worries. The device lets you to conveniently charge up to three portable electronic devices concurrently while you’re on the go. You can have your iPod, cell phone and PDA plugged into this at the same time it’s plugged into either your wall or your car (using the DC adaptor). The Power Station Traveller’s handy carrying case opens up the capability for you to bring along all the cords you need for your devices and other accessories you may need. It’s basically a small bag you can stash everything in without having to worry about losing the cords or your other accessories.

It has adjustable built-in sliders to securely hold your gadgets in place while driving or on the move. The compact size gives you the ability to tote your stuff easily with its hand-carry strap and adjustable shoulder strap. It is made out of a heavy-duty luggage quality material for extra durability. This device is perfect for the frequent traveler or if you’re on the road often.

It comes with a one-year warranty on all manufacturing defects and is compatible with all iPods, including the shuffle. It will also work with just about any other electronic device or phone you may have. You will never leave your charger behind again or spend your valuable time digging around a hotel room looking for multiple wall outlets.

The Power Station Traveller is available for $39.95 (plus shipping) at www.welovemacs.com. In addition, you can purchase the optional iPod and Power Station Traveller AC/DC Converter for $14.95. You can then plug the Power Station Traveller into the AC wall adapter at home or in your hotel room while you’re traveling. This is a good inexpensive solution for you to charge your iPod using an AC adapter without having to worry about your iPod charger. Unfortunately no local Hawaii vendors carry either of these products yet, so you’ll have to buy both from the website above.

Wednesday, August 02, 2006

Nike+iPod: Running With The Gear

nike+ipod
Ever since I started running, I’ve tried multiple pedometers to track my miles, but none of them were accurate so I gave up on them. I found this very frustrating because I always want to know the exact distance I run to track myself. Well, Apple and Nike partnered up to offer an accurate solution to this runner’s problem.

The Nike + iPod Sport is the newest gadget that takes you running. It turns your iPod nano into a personal trainer while you choose different work out options - an open-ended workout, timed goal, distance goal and a calorie-burning goal. You need to calibrate the iPod Sensor for accuracy to your body and take it for a test run. You also have to pick the music for your workout, and most importantly your PowerSong. When you start to slow down while going up that huge hill, your chosen PowerSong will automatically play to get your legs pumping again.

While you’re running, your iPod nano will show you elapsed time, current pace, distance covered, calories burned and title/artist/album of the song you’re listening to. You’ll also hear a voice giving you feedback on your run progress (customizable to a male or female voice). All your workout data is then stored on your nano and you can sync and track your workout data on www.nikeplus.com. iTunes will display your last workout but it does not store all your workout data on your hard drive.

You need three things to make the whole system work – iPod nano (and only the nano), Nike + iPod Sport Kit and a pair of Nike+ shoes (sort of). Start off by making sure you have the latest iTunes software (at least version 6.0.5) from Apple, downloadable at www.apple.com/itunes. Then you need to make sure your iPod software is updated to version 1.2 or later and attach the iPod receiver to your nano. You’re then supposed to place the Nike + iPod sensor into your Nike+ shoe’s special insole pocket, only I wasn’t about to give up my favorite pair of running shoes so quickly.

Being the “Miss MacGyver” I am, I was determined to make this thing work with my good ol’ beloved shoes. I wrapped a whole bunch of velcro, in a crisscrossed shape, around the sensor and then used more velcro to firmly secure it to flat to my shoelaces. Voila it works! The sensor itself reads your back and forth movement opposed to the up and down movement as a pedometer would, so it’s fine.

There is no 100% guarantee for my method to work, but it was okay for me. I actually really love Nike shoes and used to have them, but my podiatrist says that I can’t use those anymore because of the shape of my feet. I unfortunately had four toenails fall off on me last year from running with my former beloved Nike shoes. Too bad – personally, I don’t want to chance it again with the Nike+ shoes, but I’m sure everyone else will be fine. I just have weird-shaped feet.

The non-rechargeable battery on the iPod sensor will last you about 1,000 hours, but if you’re not actually running or walking with those shoes, I would remove it out/off your shoe to conserve the battery. It will warn you when there is approximately two weeks of life remaining. Also if you know you’re not going to use it for awhile (or before boarding an aircraft), you can put the sensor to sleep by pushing the sleep/wake button for three seconds with a paper clip.

Although I had to compromise my Nike + iPod kit, I was more than satisfied with its performance. It’s more than a high-tech pedometer. To find one of these of your own, visit the Apple Store at Ala Moana Shopping Center or www.apple.com. If you choose the Nike+ shoes, you can pick-up a pair for $100 at Niketown or www.nikeplus.com. Happy running!